Kontera

Wednesday, December 23, 2009

Sending Email with ASP.NET - The quickest way


What actually happens in the script?
The complete email support resides in the System.Web.Mail namespace. In this namespace we find the class SmtpMail, whose static Send method can accept four parameters:

SmtpMail.Send(From, To, Subject, BodyText);

Tuesday, December 22, 2009

Good Programming Practices

Documentation

Comment your code such that it is clear what you code does. You should be able to figure out your code years after its written .A good programmer should be able to figure out what your code does from your comments.

Your code should be well formatted

 • Use Tabs to indent:
Use tabs to indent; don’t use spaces. The problem with the spaces is that nobody ever uses same number of spaces for indentation even with in the same file. Some people use two spaces, some use four spaces. Manually adding spaces is very difficult. So it is better to use tab instead of space.

• Add proper Comments
Comments are the most important part of your code. Add comment to your code in simple English. There are different types of comments;

     Comments put in page header


This will help to find who creates the page, when etc.

 o Comments the methods you write

  •  A description of what the procedure does
  • Type of arguments -> type of return value
  • Constraints that need to be satisfied by arguments (requires clause)
/**

* Gets value for permission
*
* @return the permission
*/
public int getPermission() {
return permission;
}

• Compound Statements must in a well structured form


Use good naming conventions


Look at the program, did you understand anything? So it is better to use good naming conventions.


Use Global variables sparingly

Use global variables carefully otherwise it will damage your code.

Provide useful error messages

You should provide a user-friendly error message while simultaneously logging a programmer-friendly message with enough information that they can investigate the cause of the error.

Let's recap the general rules:

• Always use braces to delimit blocks, even—nay, especially—one-line blocks
• Use tabs (not spaces) for indenting
• Comment every block
• Comments that apply to a single line should go at the end of that line
• Try to end comments with periods (or other appropriate punctuation)
• Use braces around every block, even one-line blocks


Friday, December 4, 2009

THE 8255 PROGRAMMABLE PERIPHERAL INTERFACE

The 8255 is a widely used, programmable, parallel I/O device.

• It can be programmed to transfer data under various conditions, from simple I/O to interrupt I/O.
• It is flexible, versatile and economical and complex.

The 8255 has 24 I/O pins that can be grouped primarily into two 8 bit parallel ports: A and B, with the remaining 8 bits a port C. The 8 bits of port C can be used as individual bits or be grouped in two 4-bit ports: CUPPER (CU) and CLOWER (CL), as shown in the figure 1.1. The functions of these ports are defined by writing a control word in the control register.

Figure 1.2 shows all the functions of 8255; classified according to two modes: the Bit Set/Reset (BSR) mode and I/O mode. The BSR mode is used to set or reset the bits in port C. The I/O mode is further divided into three modes: Mode 0, Mode 1 and Mode 2. In Mode 0, all ports function as simple I/O ports. Mode 1 is a hand shake mode whereby Ports A and/or B use bits from port C as handshake signals. In Mode 2 Port A can be set up for bidirectional data transfer using handshaking signals from Port C, and Port B can be set up either in Mode 0 or Mode 1.

Block Diagram of the 8255
CONTROL LOGIC

(Read): This control signal enables the Read operation. When the signal is low, the MPU reads data fro a selected I/O Port of the 8255.


(Write): This control signal enables the write operation. When the signal goes low, MPU writes into a selected I/O Port or control register.

RESET     (Reset): This is an active high signal; it clears the control register and sets all ports in the input      mode.

, A0 and A1: Theses are device select signals. Chip Select is connected to a decoded address, and A0 and A1 are generally connected to MPU address lines A0 and A1 respectively

CONTROL WORD
Figure 1.5 shows a register called the control register. The contents of this register called control word. This register can be accessed to write a control word when A0 and A1 are at logic 1. This control register is not accessible for a read operation.
     Bit D7 of the control register specifies either I/O function or the Bit Set/Reset function. If bit D7=1, bits D6-D0 determines I/O functions in various modes. If bit D7=0, Port C operates in the Bit Set/Reset (BSR) mode. The BSR control word does not affect the functions of Port A and Port B.
To communicate with peripherals through the 8255, three steps are necessary:


1. Determine the address of ports A, B and C and of the control register according to the chip select logic and address lines A0 andA1.

2. Write the control word in the control register.

3. Write I/O instructions to communicate with peripherals through Ports A, B and C.

Operating Modes
 
Mode 0: Simple Input or Output

In this mode, ports A, B are used as two simple 8-bit I/O ports and port C as two 4-bit ports. Each port can be programmed to function as simply an input port or an output port. The input/output features in Mode 0 are as follows.


1. Outputs are latched.

2. Inputs are not latched.

3. Ports don’t have handshake or interrupt capability.

Mode 1: Input or Output with Handshake
 
In this mode, handshake signals are exchanged between the MPU and peripherals prior to data transfer. The features of the mode include the following:


1. Two ports (A and B) function as 8-bit I/O ports. They can be configured as either as input or output ports.

2. Each port uses three lines from ort C as handshake signals. The remaining two lines of Port C can be used for simple I/O operations.

3. Input and Output data are latched.

4. Interrupt logic is supported.

Mode 2: Bidirectional Data Transfer

This mode is used primarily in applications such as data transfer between two computers. In this mode, Port A can be configured as the bidirectional port and Port B either in Mode 0 or Mode 1. Port A uses five signals from Port C as handshake signals for data transfer. The remaining three signals from port C can be used either as simple I/O or as handshake for port B.

BSR (Bit Set/Reset) Mode

The BSR mode is concerned only with the eight bits of port C, which can be set or reset by writing an appropriate control word in the control register. A control word with bit D7 =0 is recognized as a BSR control word, and it does not alter any previously transmitted control word with bit D7=1; thus the I/O operations of ports A and B are not affected by a BSR control word. In BSR mode, individual bits of port C can be used for applications such as an on/off switch. Ports A and B are not affected by the BSR Mode.

BSR CONTROL WORD


This control word, when written in the control register, sets or resets one bit at a time,

Tuesday, September 29, 2009

Friday, August 21, 2009

SIMPLE JAVABEAN APPLICATION

Step 1: Install Java Development Kit (JDK1.3) and Bean development Kit (BDK1.1) which is the fundamental development tool that underlies all JavaBeans development.
Step 2: Running the BeanBox tool .The bean box folder in the bdk folder contains the run.bat file for running the Bean Box on a windows platform. The Bean Box tool appears in design mode displaying three windows-the Toolbox, Bean Box and properties Window.
Toolbox window displays all of the beans currently available to the Bean Box tool.
Beanbox window is a kind of form that you drop beans onto and arrange into an application.
Properties window displays the properties of the bean selected in the Bean Box window. The properties and their values are displayed with appropriate property editors so users can edit property values.
Step 3: Creating an Application :-Juggler bean and two OurButton beans
The application consists of three beans that are supplied with the beanbox tool-a juggler bean and two OurButton beans
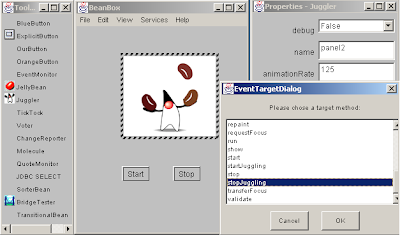
For adding a juggler bean to the Beanbox window, first point to the juggler icon in the toolbox and click the left mouse button. move cursor to the Bean box window. Newly added bean display a striped boundary, indicates that the bean has the focus.Then add 2 OurButton bean and change the Label property from Press to Start .Given below is the Bean Box with juggler bean(an animation bean that displays a little man named Duke)and two OurButton bean.

Step 4: Connecting Bean
Connect or “wire up” the Stop Button with the juggler bean.When an event occurs at the button, it can be communicated to the juggler bean.For that first select the stop button, then open Event submenu from the Edit Menu, then select action à Actionperformed .A red line should appear connected from a Stop button to the tip of your mouse cursor arrow. Point it to the juggler bean and click anywhere, inside bean’s interface, the Event Target Dialog Box will appear, which displays a list of juggler bean methods that an event can trigger. Select ‘stopjuggling’ method from the list and click OK button.


Do the same thing for Start button and select ‘Startjuggling’ method from the list.
Step 5: Running in Runtime mode
The bean box tool opens in design-mode by default. Switch to runtime mode by disabling the Bean box tool’s design-time mode.
Select Disable Design-mode command from View menu and the toolbox and properties window disappear leaving the bean box window displayed. Switch back to design-time mode by selecting the Enable Design mode command from View menu.
Step 6: Saving and Restoring an Application
The bean box tool lets you save application that you wore together in the bean box window, Select save command from file menu and type name of program as duke.bnb for instance and click save button. The animation program is saved to the disk. You can reload the application through Load command on the file menu
MOLECULE BEAN AND OURBUTTON BEAN
Step 1 :Start the BDK ie change to directory c:\bdk\beanbox and execute the run.bat file.
Step 2:Molecule bean displays a 3-D view of a molecule.This component also has methods that allow the molecule to be rotated in space along Xor Y axis.Put a molecule bean and put two OurButton bean labeled Rotate X and Rotate Y .

Step 3:Create and configure an instance of Molecule Bean & OurButton Bean

Step 4:From the Event Target Dialog box select the “Rotate on X” method and “Rotate on Y” method accordingly. And click OK button.
You will get a message generating and compiling adapter class.
Disable the design-time mode from View menu; you will get the result like this.

Saturday, August 15, 2009

B.Tech Old Question Papers

Web Technologies

ModuleI

PartA

1. Compare XML with HTML.***
2. Discuss about CDATA section.
3. What is XML? Write some applications of XML. What are attribute of Tags?
4. What is SGML? Discuss its features. *
5. List some features of SGML. What is HTML? Compare with XML.
6. What are Entity References?***
7. Explain XML parser. Explain how XML documents are parsed and send to an application. *
8. What are the attributes of Tags?
9. What you mean by DTD? How DTD ensure consistency of XML documents?
10. Briefly explain starting and ending tags.
Part B

1.( i)Explain about simple XML documents. (6 marks)
(ii) Explain about Entity References. (6 marks)
2. (i) Explain briefly about Attribute types and defaults. *(6 marks)
(ii) Discuss about starting and Ending of tags. *(6 marks)
3. (i) Explain the concept “XML a subset of SGML”. (6 marks)
(ii) Write a simple XML document and explain the views of an XML document.* (6 marks)
4. (i) Explain Entity References. **(6 marks)
(ii) Explain briefly about CDATA section.** (6 marks)
5.(i) Explain the views of an XML document. *(6 marks)
(ii)What are the uses of tags in XML ? Explain starting and ending tags. *(6 marks)
6. (i) Explain the use of flag CDATA and #PCDATA. (6 marks)
(ii) What are the common programming errors while using XML? (6 marks)

Module II
Part A
1. Discuss about element type declaration.
2. Explain Attribute defaults. ***
3. Discuss some applications of XML. *

Part B
1.Explain the process of displaying XML Data in HTML browser as HTML tables.* (12 Marks)
2.Explain the following: —
(i) Storing XML data in HTML document. (6 Marks)
(ii) XSL style sheets.** (6Marks)
3. (i) Explain the process of storing XML data in HTML document. (6 marks)
(ii) Explain Attribute Defaults.** (6 marks)
4. Write short notes on:
(i) XSL style sheets.
(ii) Attribute types. (2x6 = 12 marks)
5. Explain Document Type Definitions (DTD). Explain how DTD help to type check documents? (12 Marks)
6. (i) Write an XML document that stores some tabular data. (6 marks)
(ii) Write on HTML page that displays the above XML data. (6 marks)

Module III
Part A
1.Write about bound and constrained properties of Java Beans.*
2.What is meant by customization?*
3.Write a short note on Introspection concept.*
4.What are Java Beans?
5.List some features of GUI.
6.Briefly explain advantages of Java Beans.*
7.Explain different methods defined by BeanInfo interface.
8.Enumerate the features of Java Beans.
9.List the properties of Java Beans.
10.State the advantages of GUI.
11.Explain how to provide persistence for Beans through Serialization.
Part B
1.Write short notes on:
i) Designing Java Beans.
ii) Creating and using properties of Java Beans
2.Discuss about providing custom property editors and GUI Interfaces.**
3.Explain in detail the features of Java Beans and about designing Java Beans.*
4.Explain
i) the properties of Java Beans
ii) the need for customization
5.With an example explain the Introspection concept using BeanInfo clause.
6.With a suitable example, illustrate various aspect of Bean programming including introspection and usage of BeanInfo clause.
7.Explain how Java Beans functionality is provided by “java.beans” package. Briefly explain classes and interface in that package.
8.Explain in detail about bound and constrained properties of Java Beans.
9.Explain in detail about properties of Java Beans.
10.Explain what you mean by property. Briefly explain design patterns for simple and Indexed properties.
11.What you mean by BeanInfo interface? Explain different methods defined by Beaninfo.

Module IV

Part A
1.What is a serialized bean?
2.What is the use of Java Beans in JSPs?
3.What you mean by scriptlets?
Part B
1.Write short notes on:
i) Using Java beans in JSP******.
ii) Scriptlets***
2.Explain about accessing beans via scriptlets******.
3.Write in detail about the advantages of JSP over CGI programs with example****.


Module V

Part A

1. Describe EJB.

2. Write the features of entity bean.

3. Write the basics of EJB.

4. Distinguish between Session beans and Entity beans.

5. With a neat schematic, explain the interaction of different parties in EJB.

6. List steps for deploying entity beans.

7. What do you mean by EJB? What are the top three values of EJB?

8. Explain distributed objects. Briefly explain the terms a) Stub b) Skeleton .

Part B

1. Briefly explain three different kinds of Enterprise beans defined by EJB 2.0.

2. With neat schematic explain how clients interfaced with an EJB component system.

3. Explain in detail about the types of beans and development of session beans.

4. Describe in detail the features and basics of developing entity beans.

5. Briefly explain the steps involved in developing an EJB Component.

6. Explain the development of stateful session beans.

Web Technologies - Lecture Note

SYLLABUS
MODULE I
Introduction to SGML – Features of XML –XML as a Subset of SGML – XML Vs HTML – Views of XML Document - Simple XML Document – Starting and Ending Tags – Attributes and Tags –Entity References – Comments – CDATA Sections
MODULE II
Document Type declarations – Creating XML DTDs – Element type declaration – Attribute List Declaration – Attribute types – Attribute defaults – Displaying XML Data in HTML browser as HTML tables – Storing XML data in HTML document – Converting XML to HTML with XSL minimalist XSL style sheets – XML applications
MODULE III
Java Beans: Features – Designing Java Beans – Creating and using properties – Induced – bound and constrained properties – using and creating events – Introspection – creating and using BeanInfo clauses – customization – provide custom property editors and GUI interfaces.
MODULE IV
JSPs - Creating simple JSP Pages – templating – Request time expression – Request & Response objects – Reading parameter values – Using Javabeans in JSPs - Reading & setting Properties of JavaBeans – Connecting forms & bean properties – Serialized beans – declaring variables & methods in pages – scriptlets – conditionals, loops & execution handling in JSPs with scriptlets – Accessing beans via scriptlets.
MODULE V
EJB – Basics of EJB – Types of Beans – Development of Session Beans – Steps – Creating & Implementing Interfaces – Writing Deployment descriptors – Packaging and deploying bean - using the bean from a client – Development of stateful session bean. Entity beans – Features (Basics of developing and using entity beans)
Download

Notes

Module I Download

Module II Download

Module III Download

Module IV Download

Module V Download
Questions

First Assignment Questions 2009 Download

First Sessional Examination 2009 Question Paper Download

Reference Materials

  1. Document Type Declarations Download
  2. What is XML Download